Friday, April 27, 2018

Fiber Fun #3

Ready for some more wonderful fibers? Me too! But before we get to that I first want to talk about using color pencils on fabric. I have Faber Castell Albrecht Durer pencils and I found that they were easy to use and reacted immediately to water. The control was easy because you add as much color as you need where you need it. The colors stay true and of course, there are tons of them so you have a great variety with which to experiment. The real plus was this medium left the holes in the Aida cloth wonderfully visible and easy to stitch on. The only problem is due to their very nature of being a water medium, they are not permanent. This isn't the end of the story because I am going to find out more about working with these pencils and the possibilities (especially since I already have them). In the meantime, I discovered that Derwent Inktense color pencils are permanent on fabric. I thought I would try them to see how they would work on my cloth, so I ordered a few of them from Blick Art Supply and am awaiting their arrival. Here is a picture of the Faber Castell cloth sample and the pencils I used:

Too yellow for my purposes but still a very nice effect.
Want to change it? Just add water!

Could not believe how great these pencils reacted
to water, dissolving into wonderful muted colors.
I also ordered the new Faber Castell Gelato set of Translucents and am eager to see how they will work. As soon as I get them I'll have an update.

Now it may seem that all of this information is all over the map, but here is the thing. I would rather do this experimenting to find out what I can and cannot use on the front side rather than wait until I need the information quickly on the back side. This enables me to know how to proceed on my projects quickly. For instance, on some of my sweeter projects with pastels, I know that the Twinkling H2O's will provide a wonderful backdrop if needed. For some of the other work, the Gelatos will be my main pick, and for some experimental pieces, maybe the Tattered Angels. My being a mixed media fiber artist means various approaches can be used, while the basics of cross stitch, glass beads (Oh yes, glass beads will be something we will be talking about in the future too!), paint or markers, and of course wonderful fibers, will always be part and parcel of the work.

Even if your piece contains various mixed media, it can still be identified by the elements you put into it. If they are consistent, then that will define the ingredients of your creations. Art and artists evolve over time because of the amount of work they do. They come to a place where they realize that this is where they need to be and how to do it, so works like Picasso and van Gogh are easily recognized. But remember their work didn't always look like that. They had to experiment and explore too and make modifications to their styles. Then VOILA!

Don't ever be afraid to experiment with your art, wonderful discoveries await you!

FABULOUS FIBERS #3

So now we come to Kreinik Holographic blending filaments. These are amazing. Most of us are already familiar with the name Kreinik and the wonderful fibers they produce, which is quite a variety and in lots of beautiful colors. When added to floss as blending filament or using the thicker fibers alone, they lend a wonderful sparkle that is relatively easy to obtain.

The Holographics look different and act differently by giving a 3D effect to stitching. The colors are nothing short of gorgeous and come in a nice variety of them.


Now I don't remember how many strands I used (can't believe I didn't write it down on here), but it looks like maybe one strand on top and two on the bottom. You can see how dimensional it looks on the bottom example.

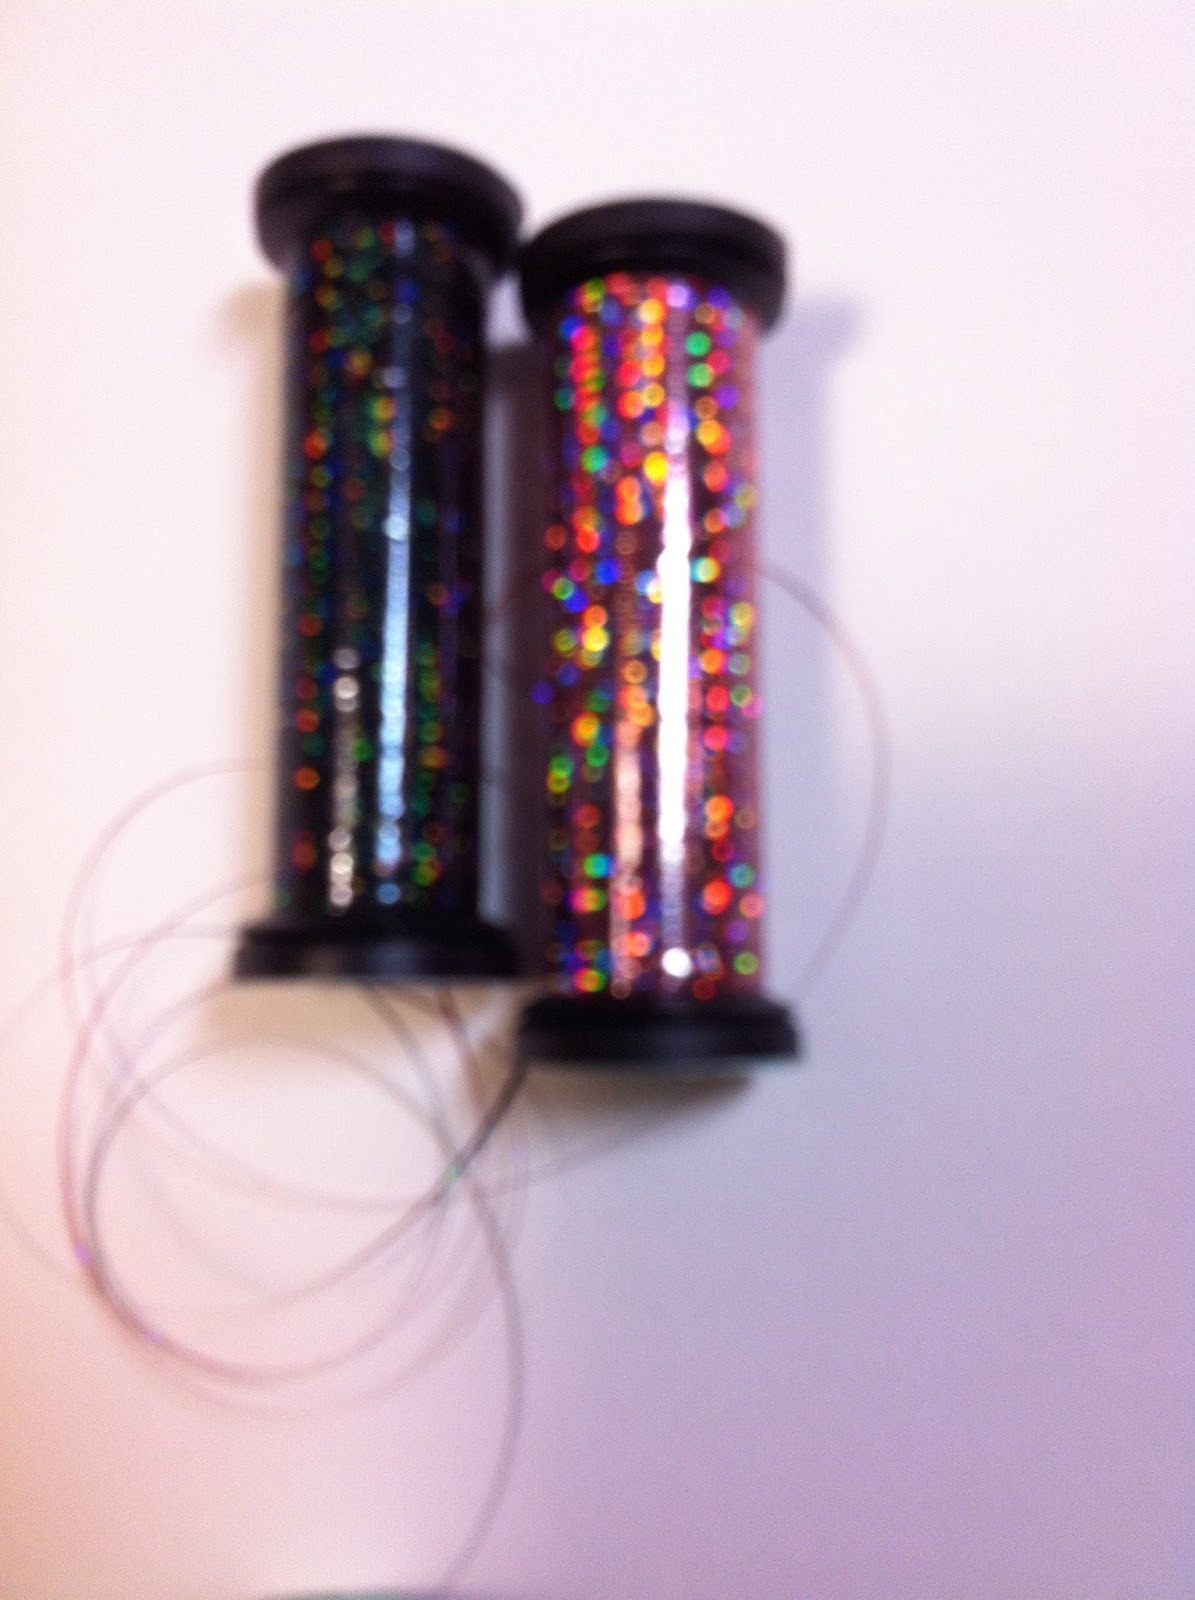
Above are the two colors I used. What a great accent for any project.


Lots of awesomeness in a small package. Love this fiber!

Now these come in a variety of sizes too, such as extra fine braid, fine braid, on up, so you can customize it to your size needed. Personally, I use the blending filament, extra fine and fine braid. Again, you have to work with this a little more as they tend to fray and stretch. Just use shorter lengths to solve that problem. There is also a particular way you have to thread the metallic so they will stay in the needle and instructions are included on the Kreinik website under How-to, see link below and check out their other amazing products while you are there:
http://www.kreinik.com/

Also note, the website states that these fibers can be used in a lot of other techniques, including knitting and crochet. How cool is that!

So I hope you will give a spool of these a try to see how you like it, I think you will be impressed.

Until next week, here is your thought nugget:

"You like it, that's all, whether it's a landscape or abstract. You like it. It hits you. You don't have to read it. The work of art-sculpture or painting-forces your eye."
~Clement Greenberg, American art critic and essayist who did much to promote the Abstract Expressionists.

Monday, April 23, 2018

Now for Something Completely Different


So this weekend I had a dilemma. I had a birthday card for my brother I wanted to send, however, I didn't care for the picture on it at all. So after thinking about it, I drug my paints out and began to play with them. Now fortunately this card was on a heavy cardstock so I knew I was pretty safe from any bleed through, as long as I didn't over do it. Here is a closer look:
Love this texture! The paper was already warped like this
when I purchased it, the paint didn't do it.
I went with the circles because of the metal embellishments already on it and just matched up metallic colors. I did the circles with the Marabu Fashion liners in gold and silver. The copper was Martha Stewart. I really wanted to give them a strong texture too and you can see the Marabu did a great job, although the Martha Stewart didn't totally disappoint. The background was done in putty in Martha Stewart as well and really complemented the rest of the card. I then did a loosey goosey kind of circle around the metallic with a Micron Pigma pen. The box was then outlined with a Sharpie Markie in a greyish blue color.

Was it time consuming? Yes. But I realized when I got done that now my brother had something more personal than an impersonal card, he had a little bit of me via my creativity too and it made it more special for me and I know it will make it more special for him as well.

So now when I look for a store bought card, I will be sure to note whether it would be a good candidate to do this again because it certainly gave the greeting a lot more meaning.

Look for another blog this week. Until then here is another thought nugget for you:

"Art is freedom. Being able to bend things most people see as a straight line."
~Overlyxclusive

Thursday, April 19, 2018

Fiber Fun #2


So today let's talk fiber, beautiful, sparkly fiber! In addition to Legacy, Threadworx also makes an artisan dyed metallic fiber using Krienik metallic braid. Comes in three sizes, #4, #8, and #12. With about 80 colors or more depending on the size you have a great palette to choose from. Also, they come in 10 yard skeins. For my purposes I use the #4.


The strands separate out very willingly so you can add or subtract them as you need. They are very easy to work with and so much fun. Isn't that sparkle amazing?!


Here I have stitched on 14 count Aida using two strands. This color called "Bradley's Balloons" reminds me of a carnival. I wanted to see the color transition so I stitched a long row this time.


Here is a close-up of the stitching. It lays down great and it all sparkles, although it is more prominent on the lighter colors.

So all in all this is another amazing fiber to get a hold of and use. Now again, it is more expensive so I don't know if you would want to use it for a large project, although you certainly could, but with the ten yards you should have plenty to fill your needed spaces. Once again, I got mine at Needle in a Haystack (but I'm sure there are other sources if you prefer), and I believe these are special order items so it may take a little bit of extra time to get them. Believe me they are totally worth it!

Link to the Threadworx website:
http://threadworx.com/

I hope you are seeing at this point that there are a lot of other fibers out there that could be used for needle arts, as well as the great cotton standbys we all love and use. Some you will love, some not so much, however, you will find that you can create lovely textures and effects with them.

UPDATE
After experimenting with the Tattered Angels, I wanted to see how watercolor pencils would work (of course you have to experiment and have fun) on the Aida. So again I took another scrap and wet the fabric first then applied my Faber Castell watercolor pencils. I have to tell you I loved working with them. Now I don't think they are permanent or could be heat set (maybe with a fabric medium, I'm not sure) but Derwent Inktense watercolor pencils are. I will discuss this more next week, with photos.

BREAKING NEWS!
I discovered that Judy, at Artistic Artifacts, is going to be selling the Twinkling H2O's in sets only in the future, so if you want to pick up a few of the individual pots, now is the time.
Here is the link:
https://www.artisticartifacts.com/product/45.html

She also has the latest and greatest set of Faber Castell Gelatos. These are called translucents and have come at a perfect time for me. I forgot to mention on my video that I also used my Gelatos on my mixed media project and they were fun on paper as well as fabric. They are just too too easy to work with! Yeah!
Here is the link:
https://www.artisticartifacts.com/SRCH.html?SearchOffset=24&Offset=24&Search=gelatos&Per_Page=12&Sort_By=disp_order

See you next week!
Keep Creating

Thursday, April 12, 2018

Different Effects with Tattered Angels

So what do you want to do with your background? There are plenty of dyed pieces out there and the option to do it yourself if you are so inclined. I found this kit on the Tattered Angels website shop and I wanted to try them because I thought they would give the background of one of my projects an ancient aesthetic. Here is what happened after I played with them.

This set is supposed to simulate concrete, but
the colors were perfect for what I needed
What I discovered is that the effects are way different on paper than on Aida fabric. I also learned that you basically have to come up with the look you want by experimenting with the paints.

Example One. When I followed directions it seemed to me what I got was a dirty looking piece of cloth which isn't what I wanted. I then decided to try more techniques on paper next.

My first attempt with the kit. Looks like a car tire ran over it
a couple of times.

Example Two. This one looked like pure chaos and not the intriguing kind.


My first attempt at dabbing with a paintbrush.
One word, UGH! Looks like a Rorschach Test.
Example Three. Instead of using a paintbrush, I decided I would just spray and dry. I really liked the way this one turned out. Now to see if I could replicate it on fabric.


Now we are getting somewhere! I think this is
a gorgeous version (on paper).
Example Four. I like this one much better. It has a mottled look and I realized I am getting better with each attempt. Now here is the thing. It is better to build up your color by layers rather than giving them a hard spray. It is easy to reapply the other colors if you want to by just spraying and then LIGHTLY giving them a brush with your paintbrush. I actually put paint on my non-stick surface and then wet my brush to dilute the paint, grabbed a very little of the paint and applied it LIGHTLY. There is a very subtle sparkle, somewhat akin to the way sand looks, which is perfect for what I'm going for. I thought that most of them (or at least those I used) could be used on fabric and porous surfaces, but maybe not...fact checking needed.


The final paper example is on the left and the
final Aida fabric sample on the right. There is
a difference in the outcome of both, but still
is satisfactory.
Now on these you will notice that there is a texture that I was trying to obtain. I used some of the Glimmer Glaze and the Glimmer Glam together to get that effect. You have to apply them heavily to get it to work and then use a heat gun to heat it up quickly until it bubbles. I am still playing with this but it is interesting and I'm hoping I can get it the way I want for an upcoming project too. It truly is cool and unique.


On paper.


On paper.


It really didn't bubble up on the Aida cloth, at
least not noticeably. Maybe it was the material
or it could have been the rougher texture, not
sure. More experimentation is in order to find
out why.
Here is something to consider with these, the sprays are messy because they are sprays, naturally, and I found them to be inconsistent with the application (some left a blank space in the middle of the spray, some made droplets and some didn't, one of the sprayers didn't work right at all). I can see now why they sell replacement bottles. They also recommended using a fan brush which I didn't have and I can see how that would have helped make it easier to move the colors around. On the fabric, I'm thinking I might heat set my final sample because one thing I noticed too, is that when you rewet the fabric with water or paint, it moves it around, even after it has been dried with a heat gun. Maybe it has to cure for a certain amount of time, I don't know, I can only speculate. While that is great for being able to work on it and make changes, I don't know if you would want to get it wet and see the colors run together after the project is completed, so you may not be able to wash it. I'll definitely have to explore this more before considering it for a finished piece.

My main concern is whether I will be able to stitch through the paint. I would really like to have that option if I want to add more to an area, however, I am not opposed to leaving a portion with just paint on it either if it works with the design. That wouldn't be a concern with the bubbling effect, because who would want to stitch over something that cool? Not a problem for me. LOL! More things to consider, but that is what this journey of exploration is all about anyway, right?!

I have to tell you, even with all the question marks and spray bottle hassles, I enjoyed using these. They lent an interesting aspect to fabric that is different from other paints. I certainly plan on playing with these more to see what I can come up with, and of course let you know what I find out.

So until next week, here is another thought nugget:

"Creativity is allowing yourself to make mistakes. Art is knowing which ones to keep.
~Unknown (at least to me)

Monday, April 9, 2018

"Original" Art

Hope this still works after all these years!
So spring has sprung and there are all kinds of cool things coming down the pike. I have to tell you I recently ran across something I am so excited about it is hard to contain myself. I mean, I was almost jumping up and down for joy! Now you may have already heard of this but it is new for me.

How many times have you found yourself drooling over a really cool stencil and having to remind yourself that you can't use it in your work because of copyright laws? Well I love the possibility of using stencils on my work, in fact, I have wanted to for a long time because I think they are an awesome effect. Well I found a really cool way to make stencils using a hot glue gun and a non stick surface. You can make stamps using hot glue too! I am definitely going to play with this. I have a glue gun that is ancient and never used which I am going to bust out now. I've also seen where they make masks as well, where you just spray some paint over a design for the white effect behind it. One lady made these really neat looking trees! Wow! Another made a stamp using just a wooden block, like a children's building block that you could get from any hobby store, and hot glued designs on all the sides. One block and you had multiple designs. Of course these are not going to have the precision of the store bought variety, but it doesn't matter if it's yours to have fun with and make your own.

So how fun is this going to be? Very, of course! Can't wait. I may have to take back all the things I've said about glue now. LOL!

For more information you can go to YouTube and check out the videos. They have lots of them and they are a blast to watch. I hope to have some of these made by the next video....

I am also expecting my order from Tattered Angels today too, so there will be lots to share in the next video.

In the meantime here is a thought nugget:

"Whether you succeed or not is irrelevant, there is no such thing. Making your unknown known is the important thing."
~Georgia O'Keeffe

Tuesday, April 3, 2018

April 3, 2018 Pear Blossom Video


Hello everyone! After such a long absence here at last is the video I promised. When viewing the video please note that it is not my lunch or drool that stains my shirt but in fact is silver paint that I thought I got out after getting it on me that morning. Sorry about that, I saw it after I did the video and since I do not have time to redo it, I hope you'll excuse my mess! LOL! I touched on a lot of things in the video and it is longer than others I have done because of it. I will be posting by tomorrow the links in it to the subject matter I discussed. I hope you enjoy the video!
Keep Creating!
Debbie :o)